Diving into the heart of Japanese cuisine, we’ve discovered a treasure that’s essential to its soulful dishes: katsuo dashi. This broth, made from dried bonito flakes, is the backbone of countless recipes, offering a depth of flavor that’s both subtle and profound. It’s a testament to the beauty of simplicity in cooking, transforming a handful of ingredients into something truly magical.
We’re excited to share our take on this classic recipe, guiding you through each step with tips to ensure you get that authentic umami-packed taste. Whether you’re a seasoned chef or a curious foodie looking to expand your culinary horizons, mastering katsuo dashi will open doors to a new world of flavors. So, let’s embark on this flavorful journey together, and bring a piece of Japanese tradition into our kitchens.
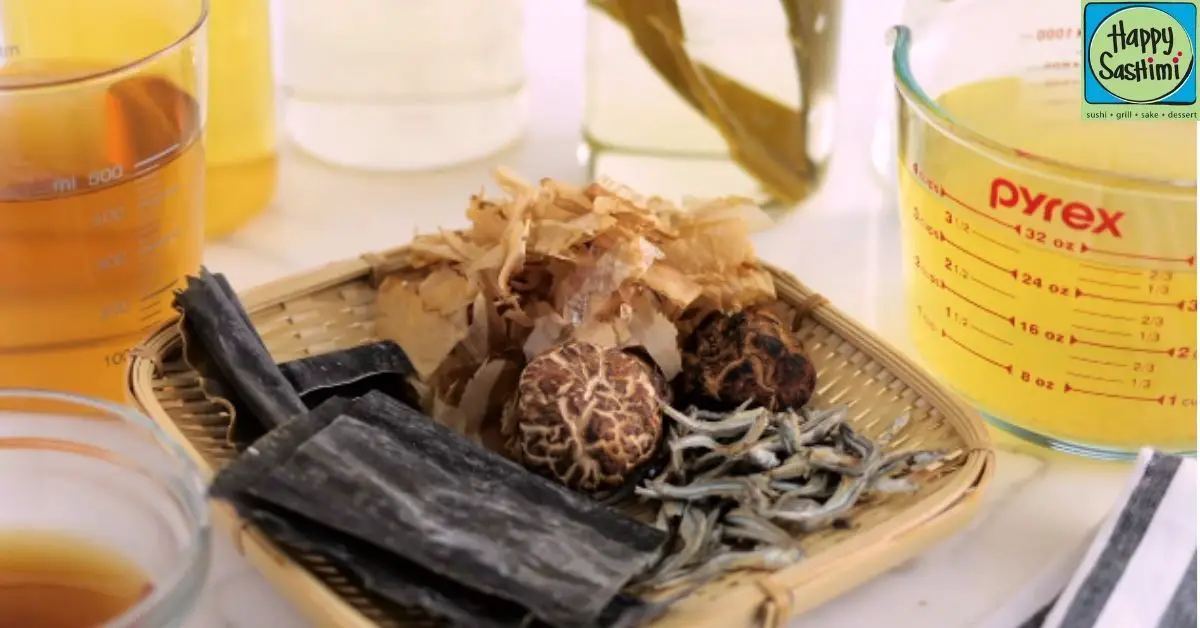
Ingredients Needed for Katsuo Dashi
After exploring the essential role of katsuo dashi in Japanese cuisine, let’s dive into the specifics of making this flavorful broth. With only two ingredients, this recipe exemplifies the culinary principle of simplicity, inviting us to appreciate the profound flavors these components bring to a multitude of dishes.
Katsuobushi (Bonito Flakes)
- 30 grams of katsuobushi (bonito flakes). These dried, smoked fish shavings are the cornerstone of katsuo dashi, imparting a rich umami flavor that is unmistakably Japanese.
- 4 cups (or approximately 1 liter) of water. The water serves as the base of the broth, extracting the flavors from the bonito flakes as it simmers, creating a clear and deeply flavorful dashi.
Equipment Required
Making katsuo dashi at home is straightforward, especially when you have the right tools on hand. Let’s dive into the essential equipment you’ll need to bring this savory broth to life.
Pot or Saucepan
You’ll need a medium to large pot or saucepan for this recipe. It should be large enough to comfortably hold the water and allow for the bonito flakes to be fully submerged. We recommend opting for a pot with a heavy bottom, as it ensures even heat distribution, minimizing the risk of scorching your ingredients. A capacity of 2 to 4 quarts is ideal for making a standard batch of katsuo dashi.
Strainer or Fine Mesh Sieve
After the bonito flakes have steeped in the hot water, you’ll need to strain them out to achieve the clear, flavorful broth that is characteristic of katsuo dashi. A strainer or fine mesh sieve is perfect for this task. Ensure that your strainer is fine enough to catch all the bonito flakes, leaving behind a smooth dashi. If your strainer isn’t quite fine enough, you can line it with cheesecloth for an extra layer of filtration. This step is crucial for achieving the pure, umami-rich flavor of the dashi without any residual flakes clouding the broth.
Prep Work
Before diving into the heart of making our katsuo dashi, let’s get everything ready. This way, the cooking process will be as smooth and stress-free as possible.
Measuring Ingredients
To begin, we’ll need to accurately measure our ingredients. For this recipe, you’ll need:
- 4 cups of water
- 1 cup of katsuobushi (bonito flakes)
Accuracy is key to ensuring the perfect balance between the water and katsuobushi, essential for achieving that rich umami flavor we’re after. Have these measured out and ready to go before we start cooking.
Prepping the Pot
Let’s get our pot ready. You’ll want to use a medium-sized pot or saucepan for this recipe. It should be large enough to comfortably hold 4 cups of water with extra space to allow the water to boil without spilling over.
- Start by thoroughly rinsing the pot. Even though it might already be clean, a quick rinse ensures it’s free from any residue that could affect the taste of our dashi.
- Fill the pot with the 4 cups of water we measured earlier and place it on the stovetop.
With our ingredients measured and our pot prepped, we’re now ready to dive into the cooking process. This preparation ensures a straightforward and enjoyable experience in making our katsuo dashi, embodying the essence of Japanese cooking with simplicity and meticulous attention to detail.
Directions to Make Katsuo Dashi
After prepping the ingredients and pot, it’s time to dive into the heart of making katsuo dashi. Follow these steps for a clear, umami-packed broth that’s foundational in Japanese cooking.
Boiling Water
- Place the pot with the pre-measured water on your stove.
- Turn the heat to high, allowing the water to reach a rolling boil. This usually takes about 5-7 minutes, depending on your stove and pot size. You’re aiming for vigorous bubbles and a steamy surface.
Adding Katsuobushi
- Once the water is boiling, reduce the heat to a simmer.
- Carefully add the pre-measured katsuobushi to the pot. Stir gently to ensure the bonito flakes are fully submerged in the water. This step is crucial for infusing the water with that distinct umami flavor.
- Allow the katsuobushi to simmer in the pot for just 1 minute. Over simmering can lead to a bitter taste, so timing is key.
- After 1 minute, turn off the heat. Let the bonito flakes steep in the pot for an additional 10 minutes. This steeping process allows the flavors to fully meld and the broth to take on a rich, golden hue.
- Finally, strain the broth through a fine mesh sieve or cheesecloth to remove the bonito flakes. Discard the flakes, as they’ve given all their flavor to the dashi.
These steps will yield a clear, flavorful katsuo dashi that’s ready to be used in soups, sauces, and other traditional Japanese dishes. The depth of flavor it adds to recipes is unmatched, making it a staple in our kitchen for vibrant, savory dishes.
Straining the Dashi
After allowing the dashi to steep to perfection, the next crucial step is straining. This process will ensure your katsuo dashi is crystal clear and free of any solids, ready to be used in a myriad of delicious dishes.
Preparing the Strainer
To begin, you’ll need a fine-mesh strainer. If you’re aiming for an exceptionally clear dashi, we recommend lining the strainer with a piece of cheesecloth. This extra layer helps to catch even the tiniest particles, resulting in a broth that’s as pure as can be. Place the strainer over a large bowl or pot, ensuring it’s secure. This setup will catch the dashi as you pour it through the strainer, leaving any solid bits behind.
Separating the Solids From the Liquid
With your strainer ready, carefully pour the katsuo dashi through it. You’ll notice the liquid passing through, leaving the katsuobushi flakes and any other particles caught in the strainer or cheesecloth. Take your time with this step to ensure you catch all solids. Once all the dashi has been strained, you can gently press on the solids with a spoon to extract any remaining liquid. However, be cautious not to press too hard, as this can cloud the dashi.
With the solids separated, your katsuo dashi is now beautifully clear and ready for use. Whether you’re preparing miso soup, noodle dishes, or simmered vegetables, this dashi will provide a foundational depth of flavor that’s lightly smoky, unmistakably umami, and absolutely essential in traditional Japanese cooking.
Ways to Use Katsuo Dashi
Katsuo dashi isn’t just the backbone of Japanese cuisine; it’s a versatile ingredient that can elevate a wide array of dishes. Here, we explore some classic and inventive ways to weave this umami-rich broth into your cooking repertoire.
As a Base for Soups and Stews
Katsuo dashi makes an exceptional base for soups and stews, where its smoky, deep flavors enrich every spoonful. A prime example is miso soup, where dashi serves as the foundation to which miso paste, tofu, and seaweed are added, creating a comforting dish that’s both simple and profound. Beyond miso soup, katsuo dashi can transform a simple vegetable stew into a savory delight. By incorporating dashi, ingredients such as carrots, potatoes, and onions absorb its umami, resulting in a dish that’s complex in flavor yet easy to make.
For Making Noodles and Broths
Noodle dishes particularly benefit from the depth of flavor katsuo dashi provides. Whether you’re preparing a hot bowl of udon or a refreshing serving of soba, starting with a dashi broth ensures that every bite carries the essence of this cherished Japanese ingredient. For udon, simmer dashi with soy sauce and mirin to create a savory broth that perfectly complements the chewy noodles and toppings like green onions and tempura. In cold soba dishes, katsuo dashi mixes with soy sauce, mirin, and a touch of sugar to form a dipping sauce that balances the soba’s subtle flavor with a hint of sweetness and umami. This versatility underscores the essential role of katsuo dashi in Japanese noodle dishes, enhancing their taste and making them unforgettable experiences.
Make-Ahead and Storage Tips
Preparing katsuo dashi in advance is an excellent way to ensure you always have this flavorful broth on hand to enhance your dishes. Here’s how to store it properly for future use.
Refrigerating Dashi
Once you’ve made your batch of katsuo dashi, it can readily be stored in the refrigerator for quick use throughout the week. Pour the cooled dashi into an airtight container or a glass jar with a secure lid. Properly stored, your dashi will retain its freshness and umami flavor for up to one week. We recommend labeling the container with the date it was made, so you always know how fresh your dashi is. Be sure to cool the dashi to room temperature before sealing it for refrigeration to maintain the best quality.
Freezing for Long-Term Use
For those looking to keep katsuo dashi on hand for longer periods, freezing is an excellent option. To freeze, pour the cooled dashi into ice cube trays. Once frozen solid, transfer the dashi cubes into a freezer bag or an airtight container. This method not only extends the dashi’s shelf life up to three months but also makes it incredibly convenient to use. Simply take out the required number of dashi cubes and thaw them for immediate use in your favorite recipes. Freezing the dashi in measured amounts can help make meal prep faster and more efficient, as you can defrost exactly what you need for your cooking.
By following these storage tips, you’ll always have katsuo dashi ready to elevate your dishes with its distinct umami flavor, whether you’re planning meals for the week ahead or stocking up for future culinary creations.
Conclusion
We’ve walked through the art of making katsuo dashi, a cornerstone of Japanese cooking that brings a world of umami into our kitchens. By mastering this simple yet profound technique, we’re not just creating a broth but unlocking the potential in every dish we prepare. Remember, the key lies in the quality of ingredients and the care in straining for that perfect clarity and depth of flavor. Whether we’re whipping up a quick soup or looking to add a touch of richness to our favorite recipes, having a batch of katsuo dashi ready is our secret weapon. Let’s keep this tradition alive in our cooking, savoring the depth it brings to our culinary adventures. Happy cooking!
Related Posts:
- Ultimate Dashi Chazuke Recipe: Flavorful & Easy Japanese Comfort Food
- Easy Katsuo Dashi Recipe: Ultimate Umami Broth Guide
- Easy Nori Tsukudani Recipe: Enhance Your Dishes with Umami
- Ultimate Umami Salt Recipe: Enhance Your Dishes with Savory Flavors
- Mastering the Umami Tsunami Roll: Ingredients, Sauce & Serving Tips