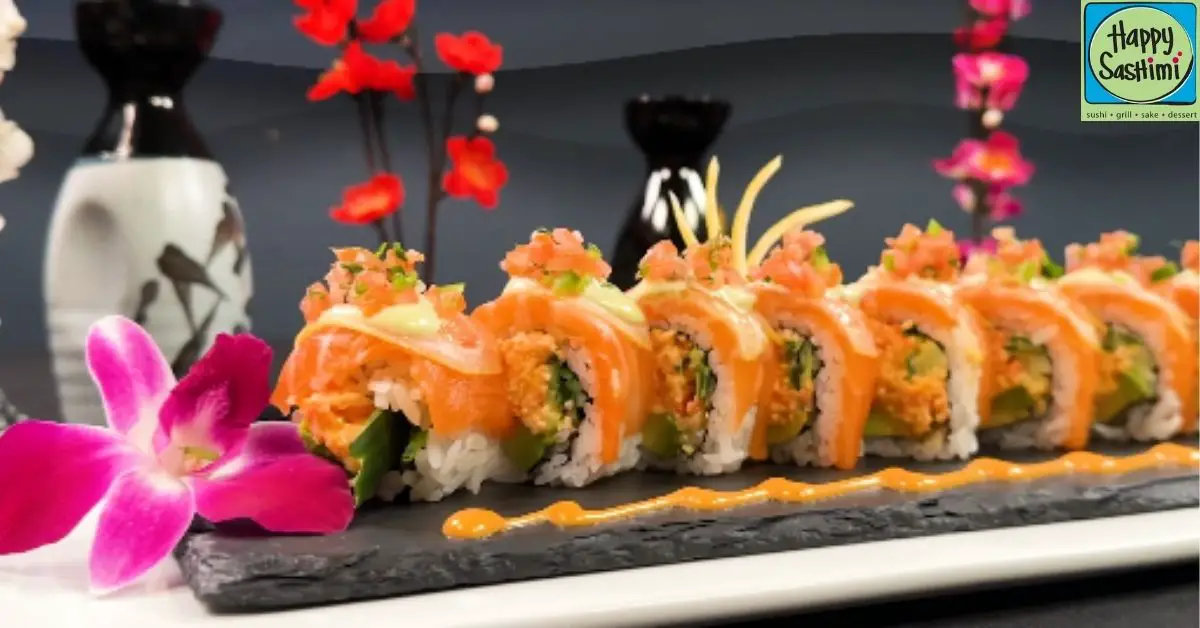
In our culinary adventures, we’ve stumbled upon a dish that’s as vibrant and joyful as a sunny day – the Sunshine Roll Sushi. This delightful creation is not your ordinary sushi roll. It’s a burst of flavors and colors that promises to bring a ray of sunshine to your plate, no matter the weather outside.
Originating from the innovative minds of sushi chefs looking to add a playful twist to traditional sushi, the Sunshine Roll combines fresh ingredients with a dazzling presentation. It’s a testament to the art of sushi making, where taste meets visual appeal. Join us as we dive into the world of Sunshine Roll Sushi, a dish that’s sure to brighten your day and tantalize your taste buds.
Ingredients
Following the introduction to the Sunshine Roll Sushi, where taste surprisingly meets visual appeal, let’s dive into the ingredients needed to create this exquisite dish. Gather these fresh ingredients to embark on a sushi-making adventure that will brighten any table.
For Sushi Rice
- 2 cups sushi rice
- 2 1/2 cups water
- 1/2 cup rice vinegar
- 2 tablespoons sugar
- 1 teaspoon salt
For Filling
- 8 ounces sushi-grade tuna, thinly sliced
- 1 medium avocado, peeled and sliced
- 1 small cucumber, julienned
- 4 sheets nori (seaweed)
- Cream cheese, softened (optional)
- Thinly sliced mango, for a sweet and vibrant finish
- Tobiko (flying fish roe), for a crunchy texture and pop of color
- Soy sauce, wasabi, and pickled ginger, for serving
Required Tools and Equipment
To embark on the delightful journey of crafting Sunshine Roll Sushi, having the right tools and equipment is crucial. It not only simplifies the process but also ensures that the creation is as joyous and satisfying as enjoying the final dish. Here’s what you’ll need:
- Bamboo Sushi Rolling Mat: Essential for rolling the sushi tightly to ensure all ingredients stay compact.
- Rice Paddle or Spatula: For spreading and fluffing the sushi rice evenly on the nori without mashing the grains.
- Sharp Knife: A sharp chef’s knife is required for slicing the sushi roll cleanly without squashing it. A dampened blade helps achieve smooth cuts.
- Mixing Bowls: Needed for preparing the sushi rice and mixing it with the seasoning.
- Sushi Rice Cooker or Pot: While a rice cooker is the most convenient option for cooking sushi rice perfectly, a pot with a lid can also do the job.
- Cutting Board: A good-sized cutting board is necessary for slicing ingredients and the sushi rolls.
- Cling Film: Helps in maintaining the shape of the sushi roll, especially when making rolls with toppings or intricate designs.
Before you start, make sure your workspace is clean and organized. Having a small bowl of water and a clean towel at hand is helpful to keep your fingers and knife slightly wet; this prevents the rice from sticking to them. With these tools and equipment ready, the art of making Sunshine Roll Sushi becomes not only achievable but also immensely fun. Let’s dive into the rolling and crafting of this vibrant dish, shall we?
Make-Ahead Instructions
To ensure your sushi-making experience is as smooth and enjoyable as possible, planning ahead can make all the difference. Let’s go through how you can prepare the sushi rice and toppings in advance.
Preparing Sushi Rice
- Rinse 2 cups of sushi rice under cold water until the water runs clear, ensuring any excess starch is removed. This step is key for achieving that perfect sushi rice texture.
- Combine the rinsed rice with 2 cups of water in your rice cooker or pot. If you’re using a pot, bring it to a boil, then reduce to a simmer, cover, and let it cook for about 20 minutes, or until the water is completely absorbed.
- While the rice is still warm, transfer it to a large mixing bowl. Gently fold in a mixture of 1/4 cup rice vinegar, 2 tablespoons of sugar, and 1 teaspoon of salt. Be careful not to overmix or crush the rice grains. This seasoning gives the rice its distinctive sushi rice flavor.
- Cover the seasoned rice with a damp cloth to prevent it from drying out. Sushi rice can be prepared up to 4 hours ahead, ensuring it remains at room temperature until you’re ready to roll your sushi.
- Slice the tuna into thin, bite-sized pieces. Store it in the refrigerator covered with cling film to maintain its freshness.
- Cut the avocado into thin slices, and to prevent browning, gently toss them in a mixture of 1 teaspoon lemon juice and 1 cup water. Drain and refrigerate until needed.
- Julienne the cucumber and refrigerate in a covered container.
- If cream cheese is part of your recipe, slice it into thin strips. Keep it chilled as well.
- Peel and slice the mango into thin strips. To avoid it from browning, you can lightly toss it in lemon juice as well. Refrigerate until you’re ready to assemble your sushi rolls.
- For the tobiko, soy sauce, wasabi, and pickled ginger, simply prepare these components by placing them in small bowls. They don’t need refrigeration and can be set aside until you’re ready to serve.
Taking these steps in advance not only saves you time but also ensures you enjoy the process of assembling your Sunshine Roll Sushi, focusing on creativity and finesse rather than rushing through prep work.
Directions
Following the make-ahead tips ensures a seamless sushi-making experience. Now, let’s dive into the steps for creating our eye-catching Sunshine Roll Sushi.
Preparing the Sushi Rice
- Begin by placing the cooked rice in a wide bowl. Gently fold in the sushi vinegar with a wooden spatula, taking care not to mash the grains. Aim for an even distribution without overworking the rice.
- Allow the rice to cool to room temperature, spreading it out in the bowl for faster cooling. A fan can expedite this process, preserving the rice’s shiny appearance.
Preparing the Filling
- Slice the tuna into thin, bite-sized pieces. Ensure each slice is uniform for consistent taste and texture in each roll.
- Julienne the cucumber, avocado, and mango. Keep the slices slender and even to ensure they fit neatly within the rolls.
- Slice the cream cheese into thin strips. If the cream cheese is too soft to slice neatly, chill it in the refrigerator for a few minutes before slicing.
Assembling Sunshine Roll Sushi
- Lay a sheet of nori on a bamboo sushi mat. With wet hands, evenly spread a thin layer of sushi rice over the nori, leaving a small margin at the top edge to seal the roll.
- Place a row of tuna slices along the bottom edge of the rice-covered nori. Add the cucumber, avocado, mango, and cream cheese strips on top of the tuna.
- Carefully roll the sushi using the mat, pressing gently but firmly to ensure the roll is tight and holds its shape. Use a bit of water to seal the nori’s top edge if necessary.
- Once rolled, set the sushi roll aside with the seam side down to help seal it shut.
- Delicately drape thin slices of avocado over the top of each roll. Use the flat of a knife to gently press the avocado slices down, molding them to the roll’s shape.
- Next, sprinkle tobiko over the avocado, creating a vibrant and textured layer. The tobiko adds both color contrast and a delightful crunch.
- Slice the roll into eight pieces using a sharp, wet knife, cleaning the knife between each cut to ensure clean slices.
- Finally, serve the Sunshine Roll on a plate, artfully arranged. Accompany with soy sauce, wasabi, and pickled ginger on the side for dipping and added flavors.
Our Sunshine Roll Sushi is now ready to dazzle at any table, combining a symphony of flavors with an impressive presentation. Enjoy the fresh, vibrant taste of this delightful sushi creation.
Serving Suggestions
Now that we’ve crafted our beautiful Sunshine Roll Sushi, let’s talk about how to serve them to make your meal even more memorable.
Side Dishes
To complement the vibrant flavors of Sunshine Roll Sushi, we recommend pairing it with a few side dishes that add to the freshness and texture of your meal. A simple cucumber salad, lightly dressed with rice vinegar, sugar, and a pinch of salt, brings a crisp, refreshing element. Another excellent choice is edamame sprinkled with sea salt. Not only are they a healthy, protein-packed option, but their bright, green color also enhances the visual appeal of your sushi feast. Lastly, consider a small bowl of miso soup. Its warm, umami-rich broth balances the sushi’s cool freshness, creating a harmonious dining experience from start to finish.
Dipping Sauces
While Sunshine Roll Sushi bursts with flavor on its own, the right dipping sauce can elevate it to new heights. Soy sauce is a must-have for its savory depth—opt for light soy sauce to keep flavors balanced without overpowering the delicate taste of the sushi. For a bit of heat, a mix of wasabi and soy sauce does wonders, allowing guests to adjust the intensity to their liking. Finally, a small dish of sweet chili sauce provides a sweet and spicy kick that complements the roll’s flavors, particularly the mango and avocado. Offering a variety of sauces ensures that every bite can be customized to perfect personal preference, making your sushi experience truly unforgettable.
Conclusion
We’ve walked through the delightful journey of making Sunshine Roll Sushi, from preparing the ingredients to enjoying the final dish with the perfect sides and sauces. It’s a culinary adventure that promises not only a burst of flavors but also a chance to get creative in the kitchen. Whether you’re a sushi aficionado or trying your hand at it for the first time, this dish is sure to impress. So gather your ingredients, roll up your sleeves, and let the sunshine in with every bite of this exquisite sushi. Remember, the joy of sushi-making is in the process as much as it is in the tasting. Let’s make every roll count!
Related Posts:
- Sunshine Roll Sushi Recipe: A Step-by-Step Guide to Fresh Flavors
- Crafting the Perfect Alaska Roll Sushi: Tips & Techniques
- Master American Dream Roll Sushi: Recipe & Plating Secrets Unveiled
- Ultimate Guide to Making Godzilla Roll Sushi: From Prep to Plate
- Mastering Passion Roll Sushi: Tips for Perfect Rolls Every Time
- Ultimate Guide to Black Dragon Roll Sushi: Ingredients & Serving Tips
- Ultimate Guide to Las Vegas Roll Sushi: Prep, Fry, and Serve Like a Pro
- Lemon Roll Sushi: A Citrus Twist on Traditional Favorites & Storage Tips
- Lobster Roll Sushi: A Fusion Delight with Easy Prep Tips